Confirm Your Country or Area
Please Confirm
Confirm your country to access relevant pricing, special offers, events, and contact information.
What are you looking for?
Communicating with Instruments using RS-232
When it comes to interfaces RS-232 is pretty inexpensive to incorporate and over the years many instruments have been designed with an RS-232 interface. To use the RS-232 interface make sure it is enabled (selected) and determine the proper cables to connect the computer to the instrument. Finally, set and verify the RS-232 communication parameters.
Cabling
To connect the instrument to a computer, you must have the proper interface cable. Most computers are DTE (Data Terminal Equipment) devices. Most instruments are also DTE devices. To connect these, you must use a DTE-to-DTE interface cable. These cables are also called null-modem, modem-eliminator, or crossover cables.
The interface cable must also have the proper connector on each end and the internal wiring must be correct. Connectors are typically a "D" style with 9 pins or 25 pins (DB-25 connector) with a "male" or "female" pin configuration. A male connector has pins inside the connector shell and a female connector has holes inside the connector shell. Most Keysight instruments use a 9-pin configuration. The Keysight 34398A serial cable with a 9-pin female connectors will work with these instruments.
If you cannot find the correct cable for your configuration, you may use a wiring adapter. If you are using a DTE-to-DTE cable, make sure the adapter is a "straight-through" type. Typical adapters include gender changers, null-modem adapters, and "D" style adapters with 9 pins or 25 pins. The Keysight 34398A Cable Kit contains cables and an adapter to help you connect serial interfaces.
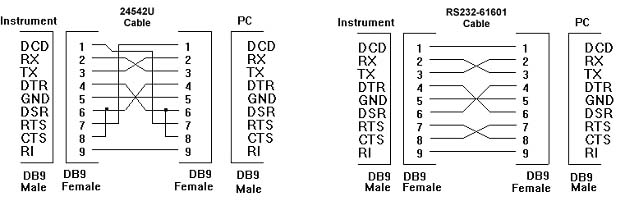
Check your instrument manual for the proper cable to use. If the manual is unavailable, try one of the two cables shown below. A typical instrument to PC cable pin diagram is shown on the right. The pin out on the left for a printer cable. This pin out will work with most Keysight and non-Keysight instruments. The diagram on the right is a simpler cable. This is the cable shipped with many Keysight instruments that support RS232.
Configuration
Both the PC and the instrument must be set to use the same configuration for serial communications. In general, the instrument will be the limiting factor for parameter setting. Newer instruments often allow you to set parameters, typically through the front panel. Older instruments often have a fixed set of parameters. Refer to the instrument's documentation to determine settings for the following parameters. Here is a table of typical parameter values:
| Parameter | Typical Values |
|---|---|
| Baud Rate | 300, 600, 1200, 2400, 4800, 9600, 19200, 38400, 57600, 115200 |
| Parity / Data Bits | None / 8 data bits, Even / 7 data bits, Odd / 7 data bits |
| Handshake Mode | None (no handshake mode), DTR/ DSR, Modem, RTS/ CTS, XON/ XOFF |
| Number of Start Bits | 1 bit |
| Number of Stop Bits | 1 bit, 2 bits |
You can write Visual Basic code that can set RS232 parameters for you. First, connect to the instrument similarly to connecting to an instrument using GPIB, LAN or USB interfaces.
    Dim mgr As KeysightRMLib.SRMCls
    Dim instrument As VisaComLib.FormattedIO488
    Set mgr = New KeysightRMLib.SRMCls
    Set instrument = New VisaComLib.FormattedIO488
    Set instrument.IO = mgr.Open("ASRL1::INSTR")
Notice how the interface family for RS232 is ASRL. Using RS232 requires you to use the Serial Interface, ISerial, built in the VISA COM libraries. Use this interface to set the RS232 parameters.
    Dim sfc As VisaComLib.ISerial
    Set sfc = instrument.IO
    sfc.BaudRate = 9600
    sfc.FlowControl = ASRL_FLOW_DTR_DSR
Termination Character
For some instruments a termination character is required for reading and writing data. A termination character is generally a non-printing character that signals the end of the data. For RS-232 most instruments require a line feed character (ASCII 10) or a carriage return character (ASCII 13). Check your instrument documentation to be certain.
    instrument.IO.TerminationCharacter = 10
    instrument.IO.TerminationCharacterEnabled = True
Command Delays
For RS-232 communications, the timing of instrument commands can become an important consideration. Consider a sequence of instrument instructions like this:
    instrument.WriteString "Command1?"
    instrument.WriteString "Command2?",value
This kind of sequence can sometimes present a problem, particularly for RS232. The difficulty lies in the WriteString command. Command1 could take longer to complete on the instrument than the PC processor takes to send Command2. This in turn can send the command before the instrument is ready.
On GPIB this isn't a problem because there is a specific bus handshake to keep things straight. On RS232 this is more difficult (although handshakes do exist). RS-232 handshakes are more oriented toward getting the bytes across the bus than the command level as a whole.
It is often necessary to insert a delay between the WriteString and the ReadString commands. It is better to delay after every command since RS232 is slow and waiting. Refer to the Delays and waits in VB article for more information about wait methods.
Troubleshooting
Here are a few things to check if you are having problems communicating over the RS-232 interface.
- On the instrument, verify that the RS-232 interface is selected (GPIB is the default interface on many instruments). Then, verify that the instrument and your computer are configured for the same baud rate, parity, and number of data bits.
- Verify that you have connected the correct interface cable and adapters. Even if the cable has the proper connectors for your system, the internal wiring may not be correct.
- Verify that you have connected the interface cable to the correct serial port on your computer (COM1, COM2, etc).
- Ensure that every command has the proper time to execute. Delay statements may be needed.